PVC trim boards are the most adaptable material for enhancing home exteriors. If done appropriately, they come in a variety of colors, finishes, and patterns to give a touch of uniqueness to your house.
Stainless steel screws or hot-dipped siding nails can be used to secure PVC trim. When it comes to fasteners, don’t cut corners and use fasteners that won’t last as long as the vinyl trim. Because stainless steel screws with tiny finish heads will never rust, they are the ideal option.

Working with PVC trim is rather simple. Using the correct tools and fasteners to secure the trim to the surface is essential. While most people will use screws to secure PVC trim, the question is if nails may be used as well.
Can I Use a Nail Gun on a PVC Trim?
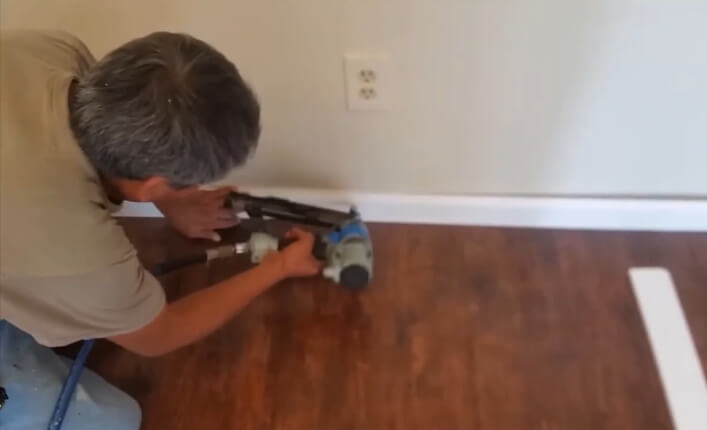
The answer is yes, nails may be used to secure PVC trim. Install PVC trim with a coil nailer and stainless 8d nails with a full round head. The 15-gauge finish nailer is ideal for indoor trimmings.
Nails, on the other hand, are not the greatest fastening available. If you can, use screws instead of nails since they are more secure and less likely to damage the trim. Nails, on the other hand, might be a good option provided you use the correct size and apply them with the right equipment.
To complete the task, you should utilize a coil siding nail gun. This particular nail gun is made to secure fragile materials like PVC trim. When compared to screws, the gun is comparatively simple to operate and can complete the work quickly. However, depending on the circumstances, you could discover that the nails aren’t as secure. You’ll also have to deal with the nail holes once the trim has been secured.
However, you must use the correct nail size to do the task properly. Nails that are too tiny will not adequately attach the trim. Nails that are too large may shatter or damage the PVC trim, necessitating repair or replacement, which is a time-consuming process.
A Guide to Correctly Installing PVC Trim Boards
PVC trim will last a lifetime if properly cared for. Use these pointers to properly install PVC trim.

Step 1: Use Carbide-tipped Saw Blades and Bits to Make Your Cuts
PVC trim boards may be cut using the same hand and power equipment as wood trim boards. However, always use carbide-tipped saw blades; ordinary steel blades will rapidly dull. The more teeth a blade possesses, the smoother the cut edges will be in general. Standard combination saw blades are recommended. Routing ornamental edges or grooves using routers or shapers is simple, but carbide-edged bits are also useful.
Sawn edges are more difficult to sand than wood edges. Such, wherever feasible, schedule your work so that newly cut edges butt against siding, soffits, or other trim, and leave the smoother factory edge visible. It’s not always necessary to sand, especially if you’re planning to paint. However, sand any edges that are extremely visible, such as those near the front entrance. With 100-grit paper, use a random orbital sander. Belt sanding is ineffective because the friction from the belt melts rather than smooths the plastic.
Step 2: Use Stainless Steel Screws or Hot-dipped Siding Nails to Secure Your PVC Trim
Don’t save money by utilizing fasteners that won’t last as long as the vinyl trim. Because they will never corrode, stainless steel screws with tiny finish heads are the ideal option. Hot-dipped galvanized nails can also be used, but they can corrode and darken the trim over time. Choose screws, slightly countersink them, and then bury the screw heads with an external filler. You can use a 15-gauge air nailer with galvanized nails and fill the holes with paintable caulk or filler in locations that are totally protected from water, such as under a soffit.
Because PVC expands and contracts in response to temperature variations, it must be securely fastened. Only drive screws or nails into the framework, not the sheathing. Choose fastener lengths that will penetrate the frame at least 1-1/2 in. If the temperature is above 40 degrees F when you install the trim, no pre-drilling or countersinking is required. Low temperatures, on the other hand, necessitate both drilling and countersinking; otherwise, the vinyl may break. Fasteners should be placed every 16 inches on both sides of the trim, about 1/2 inch from the edges. Add another fastener in the center if you’re using 10-in. or wider trim.
Use the same flashing procedures as you would for wood trim. Water should not be allowed to get between the PVC trim boards and the wall sheathing beneath them.
Step 3: for Strong, Waterproof Joins, Cement Seams
PVC has the advantage of being able to “weld” connections together to keep them tight and prevent water from getting under the trim. PVC cement with a longer “open time” than the sort used by plumbers on plastic pipes is recommended by manufacturers. This cement is available anywhere trim is sold. Before the cement sets, you’ll have approximately five minutes to clamp and fix the joints. Apply a little layer of cement to both sides before clamping or screwing the connection together. Wipe away any excess with a moist rag straight away; unlike PVC pipe cement, it’s water soluble and won’t harm finished surfaces if removed promptly.
Step 4: Assemble the Window and Door Trim Ahead of Time
Pre-assemble PVC trim assemblies and install them all at once, rather than piece by piece, as you would with wood. This may take a bit longer, but the end result will be flawlessly tight connections without the need for caulk. End joins made of cement and screws, such as miters and butt joints. Corner boards, for example, can be easily glued and fastened.
When it comes to cementing window and door trim assemblies, pocket screws are the finest way to attach corners (Photos 1 and 2). Pocket screws with a coarse thread should be used. Cut miters to fit and verify the joints and lengths of your cuts by dry-fitting them. When installing trim around vinyl or aluminum-clad windows, make sure to provide a 1/8-inch expansion space between the trim and the window frame for caulk.
Step 5: Assemble the Corner PVC Boards Ahead of Time
Outside corner trim is available from some manufacturers, but it’s not cheap. Making your own is simple. To begin, use a table saw to rip 45-degree bevels on one edge of each board. Then tape the boards together using packing or duct tape, pressing the bevel tips together securely. Apply cement to both bevels, fold the boards together, and tighten the junction with more tape for around 15 minutes.
Step 6: on Lengthy Parts, Leave Expansion Spaces
PVC trim boards will expand and shrink in response to temperature changes. Cut pieces to fit firmly if you’re adding trim in temperatures above 80 degrees F. Leave a 1/16-inch space for every 18 feet of length if the temperature is between 60 and 80 degrees. Leave a 1/8-inch space below 60 degrees. Cover the gap with acrylic or urethane caulk after installation. Silicone-based caulks aren’t recommended for use on vinyl since they don’t adhere well.
Step 7: Before You Paint, Fill Fastener Holes
After the outside filler has dried, gently sand the minor holes. Alternatively, use a paintable caulk that you can smooth with your finger. Fill bigger holes or damaged areas using car body filler, then sand it smooth when it dries.
Step 8: Use Scarf Joints to Splice Lengthy Trim Sections
Using “scarf joints,” or overlapping 45-degree junctions, splice large sections of PVC trim. Cut the first piece of trim just short of a stud so that the second overlapping trim piece may be connected to the stud about an inch from the end to prevent splitting.
Step 9: Use 100% Acrylic Exterior Paint to Paint the Vinyl Trim
Although it is not required, we recommend painting PVC trim boards. Otherwise, your trim will seem bright white, and you may notice a filling that isn’t a perfect match for the gaps. And, over time, the edges and ends (particularly those that you’ve chopped or routed) will accumulate dirt and turn gray.
After the installation, there’s no need to rush painting; you may take your time. The paintability of PVC boards is unaffected by weather. Clean any filth or oils left over from handling with mild detergent before painting, and ensure the surfaces are completely dry. Then, using any exterior acrylic paint, give it a final coat. Rather than deeper hues, use lighter ones. Dark hues absorb heat and expand more than lighter ones. Then, take a look at some important exterior painting recommendations.
Required Tools to Properly Install PVC Trim
The following tools are necessary for the proper installation of PVC trim:
– Miter saw
– Circular saw
– Table saw
– Jigsaw
– Caulk gun
– Utility knife
– PVC glue
– Hammer
– Nails
– Screws
– Drill
– Sandpaper
– Chalk line
– Level
– Tape measure
Can You Nail PVC Interior Trim?
Nail holes in PVC may be filled with practically any wood filler on the interior of a home; Bond-and-Fill is a good choice.
What Type of Nails Do You Use on PVC Trim?
204Cu Stainless Steel is a cost-effective option for attaching cellular PVC trim boards like KLEER®, KOMA®, and AZEK®. High-quality fasteners, such as stainless steel or hot-dip galvanized, are recommended by cellular PVC manufacturers. TYPE 316 stainless steel nails are recommended in sea-coastal locations.
Benefits of Using PVC Trim Over Wood Trim
1. PVC trim is more durable and resistant to weathering, making it a great choice for outdoor trim applications.
2. PVC trim does not require painting and is available in a variety of colors, making it an attractive and low-maintenance solution.
3. It is also immune to insect infestation and rot, so it is a great choice for high-humidity areas.
4. PVC trim is lightweight and easy to install, making it a great option for DIY projects.
5. PVC trim is more cost-effective than wood trim and can often be found for a fraction of the price.
The Bottom Line
When compared to traditional wood window trim, PVC window trim offers several benefits. It’s simple to work with, far more robust, and waterproof, so it’ll help shield your home from the elements.
The most important thing to remember is that PVC expands as the temperature rises, so keep that in mind when putting it. Installing your own PVC window trim should not be difficult if you understand this – and follow the other advice in our tutorial.
About This Writer

Hi, I am Eric Devin and I am a professional interior architect. Since childhood, I've always enjoyed DIY projects! And, I have loved to solve simple household problems using essential tools and equipment. I have also acquired a lot of information about basic household tools settings by working with contractors.