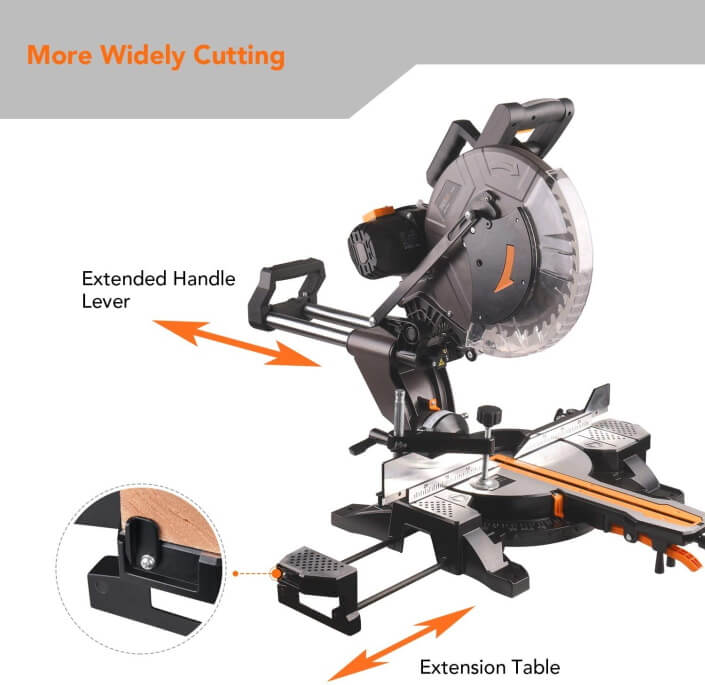
Miter saw is a brilliant cutting device used to produce a precise crosscut from different angles you intend to by simply positioning a mounted blade on the table. Six types of miter saws including standard miter saw, compound-miter saw, dual compound-miter saw, sliding miter saw, compound sliding miter saw and dual compound sliding miter saw are able to give you different design cuts.

Sometimes, for various reasons, your saw may fail to produce expected cutting results. And you might need to identify the problems for calibrating your saw to retrieve saw’s performance. However, before going for calibration, read the manufacturer’s instruction manual carefully and try to address the problems if any are detected. Always keep two key tools like level and squire available for measurement which will allow you to calibrate your saw in a proper manner.
However, considering common issues often faced by the operators, I have designed this article titled how to calibrate a miter saw to improve the accuracy.

Ways to Calibrate Miter Saw for Accurate Cuts
Your saw may fail to produce expected cutting results for a couple of reasons. Among them, your miter saw may have alignment problems including blade angles, table position, loose connection of the parts, dirt or grimy residues in the blades or other parts, fence squirting etc. To mitigate either of the situation, inspections at different levels are required to calibrate your saw to achieve the accurate performance.
Inspect Is There Any Blockage in the Blade
If you don’t get expected performance from your miter saw while making a crosscut, bevel cut or miter cut, then the simple reason could be linked to your blade like your blade might be dirty or bum. Start checking out from the very first-hand clues. Spin your blade and closely look at to detect the problems like if it curved, warp or any other abnormalities. If you find such types of problems, then it’s better to choose a couple of ways to mitigate your problem.
It’s very likely that overtime your blade may catch up pitch, gummy substance, or slime that deposits around the gullets, teeth or in a concentric ring. If so, initially you can start with cleaning your blade with simple home-made solvents to remove those residues. It might resolve your problem extending your blade’s life. In failure, then move to the other ways to sort out as discussed below.

Inspect the Blade’s Alignment
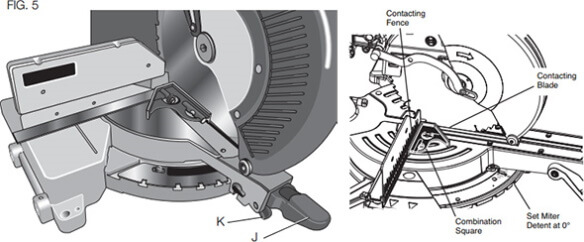
Check out the saw blade’s position at 90 degrees to the table. Turn off the power of your saw and take out the blade guard. Then get a speed squire and place it horizontally on the saw table. Position the saw blade down towards the table. Move the speed squire in the opposite direction of the saw blade excluding the teeth.
If the blade is in the proper position, the edge of the speed squire can contact the blade. Else, the blade is not squire to the table in case of any gap either on the top or bottom edge of the speed quire. In such a situation, you have to adjust your saw blade.
Adjust the Miter Saw Blade
Another issue you may identify for which your blade needs to be adjusted. The reason could be loose fitting or displacement of the blade. In such a situation, you need to loosen the bevel handle on the back side of the saw for bevel adjustment.
Adjust the bevel of the blade until successful contact with the speed square is achieved and finish adjustment by tightening the handle.
Another task is adjusting the stop bolt until it meets the bolt by using the saw blade square. If the bevel is changed and returned to zero, the bolt can stop the blade and it’s squire 90 degrees.
Inspect Table’s Position
The miter saw table is made to tight tolerance. For testing the table’s position, place a flat level on edge over the table. Have you noticed any gap between the level and the table? Another method you can apply to check the table’s position. Put a sheet of paper underneath the level to better understand if there is any gap which you were not noticing in the first attempt. If necessary, slide a few sheets of papers underneath the level. If the papers cover the gap, then the table could be tattered or pressed flat at the factory. In case of a large gap, you may need to replace your table.
Sometimes you may notice small errors in wood pieces while cutting. Factory setting could be one of the reasons. There is enough flexibility in power tools to adjust or calibrate the parts if needed to yield the best result in terms of performance. In such a situation, inspect if there are any problems with the saw base. If so detected, making necessary adjustments by tightening the screws on it or customizing using your personal judgment also could be great help.
Quick Check With the Flip Test
You can check your work with the flip test. Set your saw at 90 degrees and trim the end of a board. Then have a second cut keeping it a few inches longer than the previous cut. Then flip over the second piece and place the first one upon the second one and try to notice if the both pieces are quite steady against the fence. If you notice any trilateral gap between the pieces, it implies that the miter saw was not at 90 degree position. The same test can be applied in case of bevel cut.
Check Out Fence Alignment
One more situation you would face is linked with the fence alignment. The fence of your miter saw may not be squire to the table. Kickback or other kind of malfunction may exhaust the alignment of the fence.
To identify the problem, pull the blade down to the position it can’t move and with the pin lock the arm. Then pull the articulating blade up and place a squire, maybe a combination or the plastic triangle whatever available, against the fence and blade. If there is any gap between the squire and the fence or blade indicating the blade can’t cut at 90 degree angles or miters.
To resolve this issue, loosen the bolt with the support of a fence to the table and squire it up. Then, tighten them keeping the fence position steady while going through the process. It’s good to use split fence squirting one side of it and use it for aligning the other to the first.

Fix the Bevel Angle
To true up the bevel angle, use 45 degree of the squire and incline the saw to 45 degree alignment. If any gap between the blade and the squire is detected, align the bevel with the bevel adjustment bolt.
Read Manufacturer’s Instruction Manual
It’s mandatory task to read the manufacturer’s instruction manual before launching operation with the miter saw. There are clear guidelines on probable issues and trouble shoots spelled out in the manual. Never miss this one before you commence your operation with your miter saw to achieve the best performance.
Final Words
As I mentioned, before operation you need to have a clear understanding about any power tool and its operations. I hope this article has covered the issues related to miter saw and proven techniques of calibration so that you can achieve the highest level of performance.
Always train yourself and stay updated about your device to enjoy the optimum benefits from that. Get associated with professionals and clubs to advance your knowledge in the power tool industry.
Maintain all safety protocols including wearing PPE and workplace compliance to avoid accidents and workplace hazards.
I would appreciate it if you share your experience and get in touch with us so that we can provide consultation to make your life easy and productive.
Relevant Resources:
- How to Choose Miter Saw Stand with Wheels
- What is the Perfect Miter Saws for Furniture Making
- 10 Best Mulching Blades for Husqvarna
- Finding 10 Best Ratcheting Wrench Set Made in USA
About This Writer

Hi, I am Eric Devin and I am a professional interior architect. Since childhood, I've always enjoyed DIY projects! And, I have loved to solve simple household problems using essential tools and equipment. I have also acquired a lot of information about basic household tools settings by working with contractors.