Published on: May 9, 2024
Written by Eric Devin / Fact-checked by David Rowan
- Are you getting crumbled chips while drilling with your bit?
- Is your bit is taking too much time to drill a hole?
If any of these happens, it’s time to sharpen your drill bit. Because an excellent sharp drill bit will create long and spiral chips and can drill a hole in a short time. So if you don’t do it immediately, your bit won’t be able to work for a long time.
You can sharpen the bit by hand using a metal file or with any sharpening tool like- a bench grinder.

If you are new in the amazing world of power tool you, you can go through this article. Here I’ve discussed a few simple steps to sharpen a drill bit easily using a bench grinder.
As a newbie, you should know what is a bench grinder and different types of grinder available currently in the market.
What is a Bench Grinder
Bench grinder is a bench top grinding machine, which is usually used to run a grinding wheel. They are the smaller and portable version of large industrial grinding machines.
These type of grinding machines are used for cutting, polishing and sharpening other tools and equipment.
Bench grinders are lightweight than the larger version of grinders and can be used for both professional and personal projects.
How to Sharpen Your Drill Bit on Bench Grinder
Whenever you are facing the problem of a dull bit, you need to sharpen your drill bit immediately. If you own a bench grinder, you can use it to sharpen your drill bit. But sharpening a bit on a bench grinder isn’t so easy! You need to follow the proper steps and some tools and equipment to complete the process.

Required tools and material: To sharpen a drill bit, you’ll need the following tools and material-
- Dull drill bits,
- A bench grinder,
- A scrap wood,
- A container filled with ice-cold water,
- Safety gloves and
- Safety goggles.
Step 1:
Before starting the sharpening process, you need to get prepared. Because sharpening drill bit causes the metal to fly in the air.
Wear safety goggles to protect your eyes and leather gloves to protect the skin of your hand.
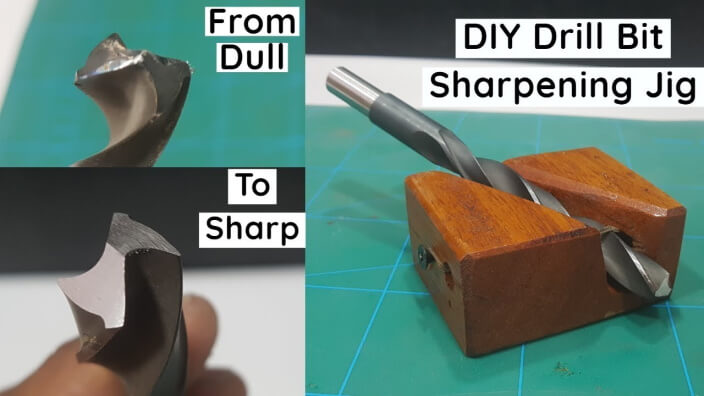
You can use a sharpening jig or vise or pliers to hold the drill bit and keep your hands away from the grinder. These tools will help you to operate the grinder easily and ensure that your bit is always at the right angle during the process.
Step 2:
After getting prepared, you need to examine your bit, because you have to remove enough metal from the bit to make it sharp again.
In many grinders, you may have two types of wheels for grinding- one is fine and another one is coarse. If your drill bit is really ravaged, you should use your coarse wheel first and then move to the fine one for later process.
If you have all the tools and safety gears, you can now start the process of sharpening your dull drill bit following these simple steps-
Step 3:
Now turn the grinder on & hold the cutting edge with a firm grip, parallel to the front of that wheel.
Move the bit slowly and carefully till it touches the wheel. Keep the bit straight and hold the original tip of the bit at 60-degree angle without turning or rotating it.
Step 4:
Place and hold your bit at the mentioned angle for highly 4- 5 seconds. Because your target is to grind the weak surface of the bit away, not to wear it down.
So just focus on only grinding the bit where the bit tip meets with the twisted shaft and you’ll get the perfect angle. Remember that the sharper the angle the sharp bit you’ll get.
Step 5:
After every 4 to 5 seconds pause grinding then dip your bit into the container of ice-cold water and cool down the metal.
If you skip this step, your drill bit will become so hot to hold and even can wear down faster which will shorten the lifetime of your bit.
When the bit become cool enough to touch, check if it is honed properly or not.
Step 6:
If you are happy with the sharpness of the first side then turn the bit at 180 degrees & repeat the same grind & cool process for the other side of the bit tip.
You should aim for that first 60-degree angle and the angle & point that has the same width on each side of the bit which will set the tool up to bore straight and clear holes.
To make sure equal sharpness, some people sharpen a bit on both sides of the bit by holding it on their dominant hand & flip it at 180 degrees after grinding for few seconds.
Step 7:
When the tip of your bit has the finely honed spot and get sharp edges at same width, give the bit a test run.
Hold the bit tip straight on a piece of scrap wood and twist the drill bit by your hand. If the bit is sharpened well it will be able to create a hole even with a light pressure.
If not, recheck the tip and get back to the grinder and try to get the ideal 60- degree slope equally on both sides.
Never get disheartened when you had to get back to the sharpening process several times because it is the part of learning about the curve.
Step 8:
When you are confident enough about the sharpness of your drill bit for wood or metal, insert it into your drill and start drilling on the same scrap wood. The drill should hit the wood with no time with a minimum pressure.
And when you remove the bit from the scrap wood, the bit will fling the wood chips when it emerges.
You can also check this video to know more detail about sharpening the drill bit with a bench grinder:
Tips for Keeping Your Drill Bit Sharp
Once you’ve sharpened your drill bit nicely, you can follow these mentioned tips to maintain the sharp cutting edge of the bit-
- After drilling an inch or so you should pull out the drill bit and blow off any chips or flakes of the wood. Otherwise, these flakes may get packed in the reed of your bit and it’ll become hot. And you know the hotter your drill bits get, the faster the bit gets dulls and you need to sharpen the bit again.
- When drilling, specially hardwood, make the stop & cool technique to your habit. Keep a jar full with cold water near you & dip the bit for few seconds after drilling one or two inches.
- You can use two full sets of bits, use the new drill bit set only to begin drilling the hole then switch to the sharpened- older one to complete the drilling job.
Conclusion
Sharpening drill bits is quite challenging for newbies!
But proper study and little bit practice can help them to achieve the expertise and confidence to do the job properly.
Hope this how-to article will help you to enrich your knowledge about the sharpening process and you’ll be able to sharpen your drill bit nicely.
But whether you are a newbie or an experienced, you don’t forget to use safety gears while using your bench grinder or any other power tool for any purpose.
You May Also Like:
About This Writer

Hi, I am Eric Devin and I am a professional interior architect. Since childhood, I've always enjoyed DIY projects! And, I have loved to solve simple household problems using essential tools and equipment. I have also acquired a lot of information about basic household tools settings by working with contractors.